speech-to-text-training.ipynb
Transfer Learning Toolkit
Transfer Learning Toolkit (TLT) is a python based AI toolkit for taking purpose-built pre-trained AI models and customizing them with your own data.
Transfer learning extracts learned features from an existing neural network to a new one. Transfer learning is often used when creating a large training dataset is not feasible.
Developers, researchers and software partners building intelligent vision AI apps and services, can bring their own data to fine-tune pre-trained models instead of going through the hassle of training from scratch.
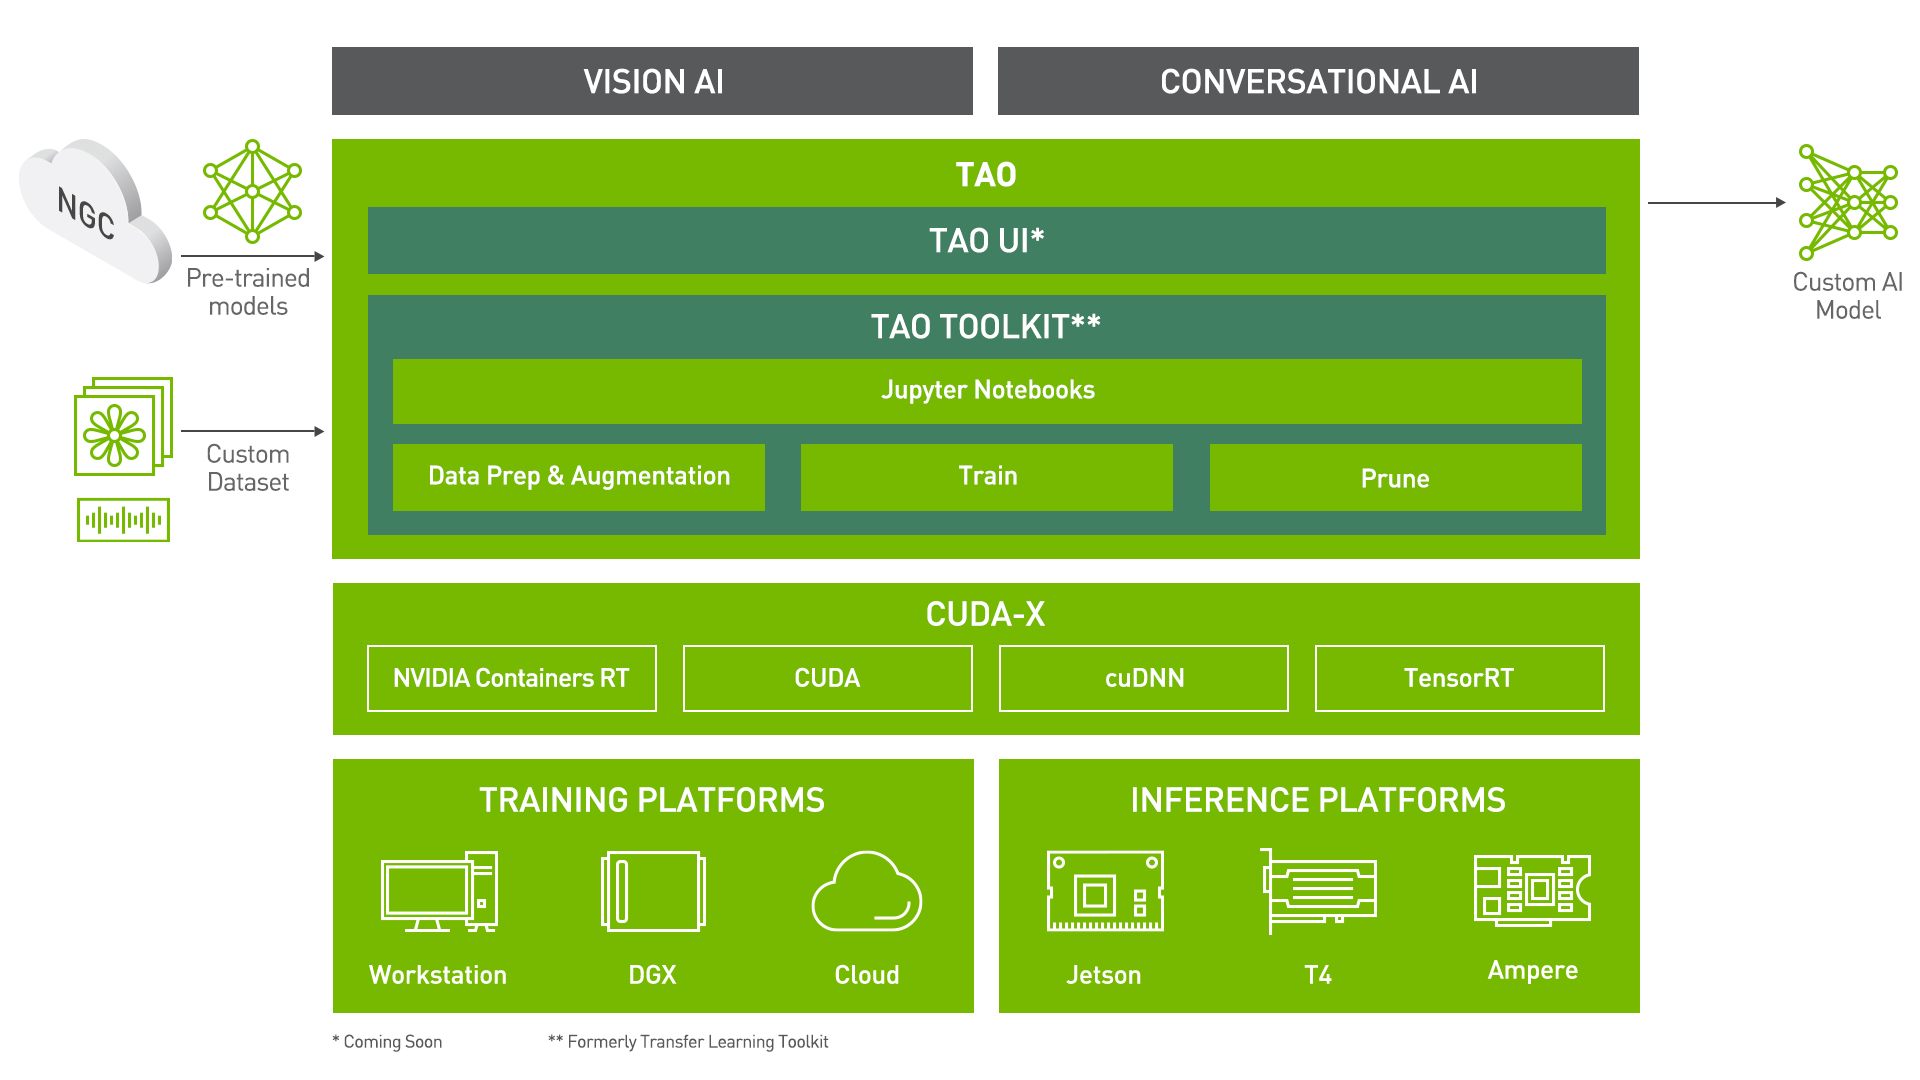
The goal of this toolkit is to reduce that 80 hour workload to an 8 hour workload, which can enable data scientist to have considerably more train-test iterations in the same time frame.
Let's see this in action with a use case for Automatic Speech Recognition!
Automatic Speech Recognition
Automatic Speech Recognition(ASR) is often the first step in a building a Conversational AI model. An ASR model converts audible speech into text. The main metric for these models is to reduce Word Error Rate (WER) while transcribing the text. Simply put, the goal is to take an audio file and trancribe it.
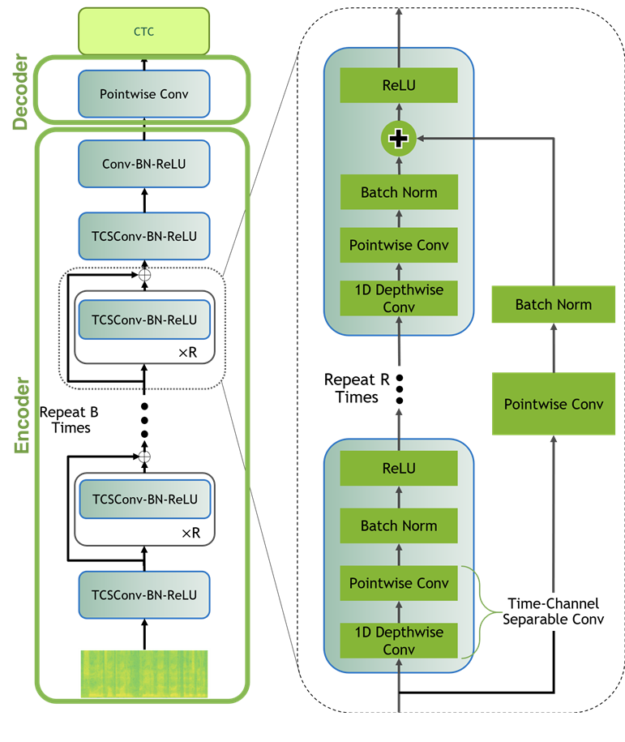
In this work, we are going to dicuss two models, QuartzNet and Jasper (Just Another SPeech Recognizer) model, both of which are end to end ASR models which take in audio and produce text.
Jasper architectures consist of a repeated block structure that utilizes 1D convolutions. In a Jasper_KxR model, R sub-blocks (consisting of a 1D convolution, batch norm, ReLU, and dropout) are grouped into a single block, which is then repeated K times. We also have a one extra block at the beginning and a few more at the end that are invariant of K and R, and we use CTC loss.
The QuartzNet is better variant of Jasper with a key difference that it uses time-channel separable 1D convolutions. This allows it to dramatically reduce number of weights while keeping similar accuracy.
Let's Dig in: ASR using TLT
Installing and setting up TLT
For ease of use, please install TLT inside a python virtual environment. We recommend performing this step first and then launching the notebook from the virtual environment.
In addition to installing TLT python package, please make sure of the following software requirements:
- python 3.6.9
- docker-ce > 19.03.5
- docker-API 1.40
- nvidia-container-toolkit > 1.3.0-1
- nvidia-container-runtime > 3.4.0-1
- nvidia-docker2 > 2.5.0-1
- nvidia-driver >= 455.23
Let's install TLT. It is a simple pip install!
! pip install nvidia-pyindex
! pip install nvidia-tlt
After installing tlt, the next step is to setup the mounts for TLT. The TLT launcher uses docker containers under the hood, and for our data and results directory to be visible to the docker, they need to be mapped. The launcher can be configured using the config file ~/.tlt_mounts.json. Apart from the mounts, you can also configure additional options like the Environment Variables and amount of Shared Memory available to the TLT launcher.
IMPORTANT NOTE: The code below creates a sample ~/.tlt_mounts.json file. Here, we can map directories in which we save the data, specs, results and cache. You should configure it for your specific case such your these directories are correctly visible to the docker container.
! mkdir <add path to DATA_DIR>
! mkdir <add path to SPECS_DIR>
! mkdir <add path to RESULTS_DIR>%%bash
tee ~/.tlt_mounts.json <<'EOF'
{
"Mounts":[
{
"source": "<YOUR_PATH_TO_DATA_DIR>",
"destination": "/data"
},
{
"source": "<YOUR_PATH_TO_SPECS_DIR>",
"destination": "/specs"
},
{
"source": "<YOUR_PATH_TO_RESULTS_DIR>",
"destination": "/results"
},
{
"source": "/home/<USERNAME>/.cache",
"destination": "/root/.cache"
}
],
"DockerOptions": {
"shm_size": "16G",
"ulimits": {
"memlock": -1,
"stack": 67108864
}
}
}
EOFYou can check the docker image versions and the tasks that tlt can perform. You can also check this out with a tlt --help or
! tlt info --verboseSet Relevant Paths
# NOTE: The following paths are set from the perspective of the TLT Docker.

# The data is saved here
DATA_DIR = "/data"
SPECS_DIR = "/specs"
RESULTS_DIR = "/results"

# Set your encryption key, and use the same key for all commands
KEY = 'tlt_encode'
Now that everything is setup, we would like to take a bit of time to explain the tlt interface for ease of use. The command structure can be broken down as follows: tlt <task name> <subcommand>
Let's see this in further detail.
Downloading Specs
TLT's Conversational AI Toolkit works off of spec files which make it easy to edit hyperparameters on the fly. We can proceed to downloading the spec files. The user may choose to modify/rewrite these specs, or even individually override them through the launcher. You can download the default spec files by using the download_specs command.
The -o argument indicating the folder where the default specification files will be downloaded, and -r that instructs the script where to save the logs. Make sure the -o points to an empty folder!
! tlt speech_to_text download_specs \
    -r $RESULTS_DIR/speech_to_text \
    -o $SPECS_DIR/speech_to_text
Download Data
For the purposes of demonstration we will use the popular AN4 dataset. Let's download it.
! wget http://www.speech.cs.cmu.edu/databases/an4/an4_sphere.tar.gzAfter downloading, untar the dataset, and move it to the correct directory.
! tar -xvf an4_sphere.tar.gz
! mv an4 $DATA_DIR
Pre-Processing
This step converts the mp3 files into wav files and splits the data into training and testing sets. It also generates a "meta-data" file to be consumed by the dataloader for training and testing.
! tlt speech_to_text dataset_convert \
    -e $SPECS_DIR/speech_to_text/dataset_convert_an4.yaml \
    source_data_dir=$DATA_DIR/an4 \
    target_data_dir=$DATA_DIR/an4_converted
Let's take a listen to a sample audio file
# change path of the file here
import IPython.display as ipd
path = DATA_DIR + '/an4_converted/wavs/an268-mbmg-b.wav'
ipd.Audio(path)
As previously discussed, there are two models we would like to discuss, the QuartzNet model and the Jasper Model. Training commands for both of them are simillar. Let's have a look!
Training
We have a very neat interface which allows the end user to configure training parameters from the command line interface.
The process of opening the training script; finding the parameters of interest(which might be spread across multiple files), making the changes needed, and double checking everything is being replaced by a much more easy to use and visible command line interface.
For instance if the number of epochs are needed to be modified along with a change in learning rate, the user can add trainer.max_epochs=10 and optim.lr=0.02 and train the model. Sample commands are given below.
A list of some of the customizable parameters along with their default values is as follows:
trainer:
- gpus: 1
- num_nodes: 1
- max_epochs: 5
- max_steps: null
- checkpoint_callback: false
training_ds:
- sample_rate: 16000
- labels: [" ", "a", "b", "c", "d", "e", "f", "g", "h", "i", "j", "k", "l", "m", "n", "o", "p", "q", "r", "s", "t", "u", "v", "w", "x", "y", "z", "'"]
- batch_size: 32
- trim_silence: true
- max_duration: 16.7
- shuffle: true
- is_tarred: false
- tarred_audio_filepaths: null
validation_ds:
- sample_rate: 16000
- labels: [" ", "a", "b", "c", "d", "e", "f", "g", "h", "i", "j", "k", "l", "m", "n", "o", "p", "q", "r", "s", "t", "u", "v", "w", "x", "y", "z", "'"]
- batch_size: 32
- shuffle: false
- name: novograd
- lr: 0.01
- betas: [0.8, 0.5]
- weight_decay: 0.001
The steps below might take considerable time depending on the GPU being used. For best experience, we recommend using an A100 GPU.
For training aN ASR model in TLT, we use the tlt speech_to_text train command with the following args:
- -e : Path to the spec file
- -g : Number of GPUs to use
- -r : Path to the results folder
- -m : Path to the model
- -k : User specified encryption key to use while saving/loading the model
- Any overrides to the spec file eg. trainer.max_epochs
Training QuartzNet 15x5
!tlt speech_to_text train \
     -e $SPECS_DIR/speech_to_text/train_quartznet.yaml \
     -g 1 \
     -k $KEY \
     -r $RESULTS_DIR/quartznet/train \
     training_ds.manifest_filepath=$DATA_DIR/an4_converted/train_manifest.json \
     validation_ds.manifest_filepath=$DATA_DIR/an4_converted/test_manifest.json \
     trainer.max_epochs=1 \
     training_ds.num_workers=4 \
     validation_ds.num_workers=4
Training Jasper 10x5
!tlt speech_to_text train \
     -e $SPECS_DIR/speech_to_text/train_jasper.yaml \
     -g 1 \
     -k $KEY \
     -r $RESULTS_DIR/jasper/train \
     training_ds.manifest_filepath=$DATA_DIR/an4_converted/train_manifest.json \
     validation_ds.manifest_filepath=$DATA_DIR/an4_converted/test_manifest.json \
     trainer.max_epochs=1 \
     training_ds.num_workers=4 \
     validation_ds.num_workers=4
ASR evaluation
Now that we have a model trained, we need to check how well it performs.
!tlt speech_to_text evaluate \
     -e $SPECS_DIR/speech_to_text/evaluate.yaml \
     -g 1 \
     -k $KEY \
     -m $RESULTS_DIR/quartznet/train/checkpoints/trained-model.tlt \
     -r $RESULTS_DIR/quartznet/evaluate \
     test_ds.manifest_filepath=$DATA_DIR/an4_converted/test_manifest.json
ASR finetuning
Once the model is trained and evaluated and there is a need for fine tuning, the following command can be used to fine tune the ASR model. This step can also be used for transfer learning by making changes in the train.json and dev.json files to add new data.
The list for customizations is same as the training parameters with the exception for parameters which affect the model architecture. Also, instead of training_ds we have finetuning_ds
Note: If you wish to proceed with a trained dataset for better inference results, you can find a .nemo model here.
Simply re-name the .nemo file to .tlt and pass it through the finetune pipeline.
Note: The finetune spec files contain specifics to finetune the English model we just trained to Russian. If you wish to proceed with English, please make the changes in the spec file finetune.yaml which you can find in the SPEC_DIR folder you mapped. Be sure to delete older finetuning checkpoints if you choose to change the language after finetuning it as is.
!tlt speech_to_text finetune \
     -e $SPECS_DIR/speech_to_text/finetune.yaml \
     -g 1 \
     -k $KEY \
     -m $RESULTS_DIR/quartznet/train/checkpoints/trained-model.tlt \
     -r $RESULTS_DIR/quartznet/finetune \
     finetuning_ds.manifest_filepath=$DATA_DIR/an4_converted/train_manifest.json \
     validation_ds.manifest_filepath=$DATA_DIR/an4_converted/test_manifest.json \
     trainer.max_epochs=1 \
     finetuning_ds.num_workers=20 \
     validation_ds.num_workers=20 \
     trainer.gpus=1
ASR model export
With TLT, you can also export your model in a format that can deployed using Nvidia Jarvis, a highly performant application framework for multi-modal conversational AI services using GPUs! The same command for exporting to ONNX can be used here. The only small variation is the configuration for export_format in the spec file!
Export to ONNX
!tlt speech_to_text export \
     -e $SPECS_DIR/speech_to_text/export.yaml \
     -g 1 \
     -k $KEY \
     -m $RESULTS_DIR/quartznet/train/checkpoints/trained-model.tlt \
     -r $RESULTS_DIR/quartznet/export \
     export_format=ONNX
Export to Jarvis
!tlt speech_to_text export \
     -e $SPECS_DIR/speech_to_text/export.yaml \
     -g 1 \
     -k $KEY \
     -m $RESULTS_DIR/quartznet/train/checkpoints/trained-model.tlt \
     -r $RESULTS_DIR/quartznet/jarvis \
     export_format=JARVIS \
     export_to=asr-model.ejrvs
ASR Inference
You might have to work with the infer.yaml file to select the files you want for inference
!tlt speech_to_text infer \
     -e $SPECS_DIR/speech_to_text/infer.yaml \
     -g 1 \
     -k $KEY \
     -m $RESULTS_DIR/quartznet/train/checkpoints/trained-model.tlt \
     -r $RESULTS_DIR/quartznet/infer \
     file_paths=[$path]
ASR Inference using ONNX
TLT provides the capability to use the exported .eonnx model for inference. The command tlt speech_to_text infer_onnx is very similar to the inference command for .tlt models. Again, the inputs in the spec file used is just for demo purposes, you may choose to try out your custom input!
!tlt speech_to_text infer_onnx \
     -e $SPECS_DIR/speech_to_text/infer_onnx.yaml \
     -g 1 \
     -k $KEY \
     -m $RESULTS_DIR/quartznet/export/exported-model.eonnx \
     -r $RESULTS_DIR/infer_onnx \
     file_paths=[$path]
What's Next?
You could use TLT to build custom models for your own applications, or you could deploy the custom model to Nvidia Jarvis!